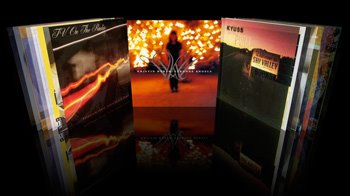
Saturday, September 30, 2006

Using iPhoto to resize photos

It isn't immediately obvious how you get photos out of iPhoto for use with other applications, let alone resize them. I didn't think to look in Export for this feature.

Select the album or images within an album you want to export then select File | Export.


You'll be presented with this dialog - just choose "Scale images no larger than" and type in a width or height. It will preserve the best aspect ratio for each photo.

You can also choose the QuickTime tab to export photos to a QuickTime slideshow as well.

iPhoto is not without its trials but this is a good feature. There just needs to be a button to do this so it's more obvious.

Tuesday, September 12, 2006

Apple did employ the coverflow guy (or at least his software)

It seems Apple did like the coverflow product - and even kept it's name while integrating into iTunes (must have read my post :). Now it seems clear why the Coverflow stand-alone software only worked until September - in time for the big Apple iTunes 7.0 release. You can see Steve Job's keynote "It's Showtime" on Quicktime on the Apple site.
Congratulations on a great product - and on Apple recognising it.

Monday, September 11, 2006

First top 10 Mac OS X applications (alright maybe a few more)

Coverflow

I can't say enough good things about Coverflow. It's simple, elegant and intuitive and provides the best GUI front-end to an application I've seen. You can flick through your album art fast and search with a few keystrokes. Apple should employ this guy. With the new animation framework Apple is developing, I'm sure this sort of app will become common-place after the OS X 10.5 Leopard is delivered but you can have this slick interface free (it's time limited though so try it out now!)
Download one of the widgets that collects your album art (like Amazon Album Art) to complete you collection.
Now if only you could turn the CD around and see the tracks :)


Adium

Adium is so well integrated into the Aqua interface it's a pleasure to use. You can sign in with all the major chat clients and it's feature list is comprehensive, even down to customisable alerts and Growl integration. It'll even read you your messages if you want or just amuse you with it's icon animation.

Smultron

Apart from having the best icon, this text editor is feature-rich and easy to use. It's got syntax-highlighting and loads of other features like multiple document editing but mostly it integrates well with the Aqua interface and doesn't get in your way. Peter Borg, my compliments!
Of course, VIM is the best editor, but that's my bias and the learning curve is vertical so I wouldn't recommend that here :)


Growl

Growl publishes an event interface that any application can subscribe to. A huge number of applications provide hooks into Growl and expose application events. You take these events and customise the sort of on-screen notifications you want to see. It'll do sticky notifications too if you want to check them off and not miss them.


Firefox

If you're looking to move from Windows to Mac and feel at home, then Firefox fills that gap. It's got everything the Windows version has including the extensions framework that's become indispensible for me. Camino has adopted the aqua interface but it doesn't have extensions out of the box and I don't feel like hacking my browser. It's true, the forms screen controls suck under Firefox (they look their lickable best in Safari) but for a web browser I'd rather a pocket knife than a sabre. If I feel like browsing with style, I can always fire up Safari anyway to get my fix :)


FFView

There's a yawning lack of a good, fast thumbnail-based photo browser on the Mac. iPhoto just doesn't cut it - I don't want to import everything in my photo collection (and with 10s of thousands of photos you wouldn't want to) - sometimes you just want to browse. This goes some way towards that goal. It's browsing interface could be better but the controls and keyboard shortcuts are comprehensive and customisable so this app is still in the dock. It was designed to view Manga comics easily but it works pretty well as a photo browser. I'm yet to find the equivalent of an ACDSee or FastStone Image Viewer on the Mac yet though.


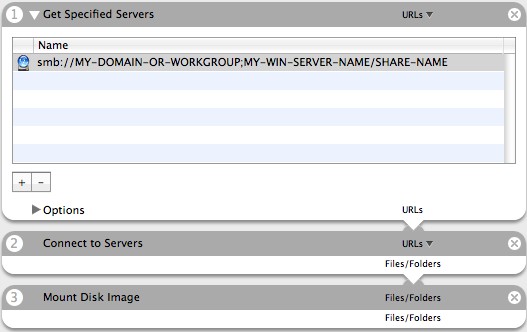
VMWare will be available as a beta for the Mac later this year but Parallels is almost the same - in function and even looks (I won't call it a copy but it's so close). It runs all the Windows apps you'd want and can also act as a virtual machine for other OSs like Linux. Mostly, it just works fine but a couple of things bug me - it doesn't have USB 2.0 support yet and there's long delays when browsing the host drives through shared folders. However, for those Windows apps you want to run without having boot into Base Camp it's invaluable.


iLife: iMovie HD

I've been looking for an application like this in the affordable price range for years. I'd pay the full cost of the iLife suite just for this application. I created an amazing video the first time in about an hour without looking at any sort of help file - it makes video editing simple, no mean feat. You can do video animation using built-in templates, drop photos in with professional-looking transitions and then burn it all to a DVD with iDVD nicely integrated with iMovie. Make sure you download MPEG Streamclip for those camera MPEG movie files that don't make it into iMovie - it lets you convert to DV or Quicktime MOV format with ease. Macs have trouble with the sound codecs on some MPEG files.


Quicksilver

Quicksilver is an application launcher with full application integration and scripting capabilities. It also allows you to bind AppleScript commands to a keystroke combination (see earlier post).

Its UI is polished and slick, with even the most mundane tasks like loading add-ins getting a spinning-cube effect. Nice.

Highly recommended - this joins Automator and AppleScript as a set of useful tools you can use to get immediate results without reading any documentation.

The iTunes current-playing track (quick popup) is a nice feature too.

iCal

iCal is the built-in calendar application for the Mac. It's simple and good to use but the best thing is it will pull down and display your Google Calendar calendars and display them all on a single page. It'll even keep them updated every x minutes. It's pull only at the moment though - it'd be SO nice if it supported push back to Google Calendar as well. We'll just have to wait for Leopard for that :)


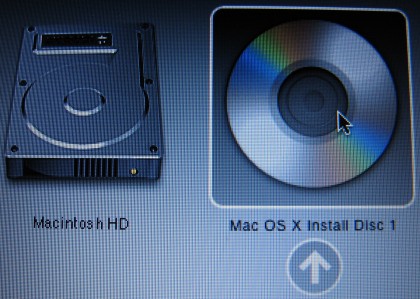
If you're a fan of Pacman, try this - it looks great and has Ms Pac man as well as interesting game levels.


It's always wise to back up and this free shareware app lets you dump your whole drive or part thereof to network or USB drive storage. It's easy to use and cheap to upgrade if you want to do incremental backups. This has saved my data through one DOA Macbook and a hard-drive upgrade. Now if Apple could get the restore working on their boot disk, I'd be even happier (see previous post).


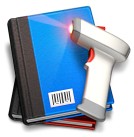
I had to mention this. It isn't quite my cup of tea - I'm not quite retentive enough to use a USB bluetooth scanner (or maybe I don't have large enough collections) but I'll admit the idea is cool and the interface is very nice. If you have a large collection of CDs/DVDs/Books you lend out all the time, then this app lets you organise and browse in style.

Friday, September 08, 2006

Connecting to network shares with a click

It used to be a pain connecting to my common windows network shares. Now it's instant. Just use the Automator aproach in the picture below, save as an application and create a symbolic link on the desktop. You'll see the share mounted as long as you've saved the credentials in your keychain.

Refreshing Finder with the keyboard

Simon blogged about how to use a small piece of applescript to refresh the Finder window using an automator action.

Here's an extension to this functionality that makes it even better.

Take the existing applescript:


tell application "Finder"
tell front window
update every item with necessity
end tell
end tell
Save this to a file in your ~/scripts folder under a name like "refresh.scpt".


Use the application Quicksilver to assign a trigger and key combination to the script and you can use something like "Command-R" to refresh the window - works beautifully.

You can find Quicksilver here (link: http://quicksilver.blacktree.com/).

Thanks to the original poster of the applescript: Eric "Heavyboots".

Two finger scroll on the trackpad

I was a bit slow to find this one - so here's a quick tip. If you want to easily scroll through web pages or documents, just drag on the track pad with two fingers (if you have a Macbook). Simple and very effective. And it's smart enough to be reliable - no gesture-related false positives.

Oh, and you can also scroll sideways. Awesome.

[Update, thanks for the comment Anonymous. You can turn this on and off in the System Preferences. Just choose "Keyboard and Mouse", Trackpad tab and check "Use two fingers to scroll".]

AVI no-sound problem solved today (finally)


[Proudly brought to you by: Doggie Go Go for iPad and iPhone]


No sound when trying to play back an AVI clip on your Mac? This could be the solution.
If you want to play back avi using quicktime that contain mp2 mpeg1, layer 2 audio (popular when encoding on windows using the divx format and common tools) then this app adds the necessary sound codec (a52).

Download the A52Codec as part of the
Perian install and all those movies that played with no sound in quicktime will now work. It's a universal binary as well. I used to have to play these files with VLC (which is great for some file formats) but now you have the option with Quicktime too and they'll play in Front Row.

Fantastic - my movie experience going from Mac to Windows is complete.

The other amazing application I use to get some older mpeg1/mpeg2 movies from my camera into iDVD HD is Mpeg Streamclip. This also does "save-as" style converts to Apple Quicktime, H264 etc. Excellent application. I export my mpeg2 clips to DV format and the go into iDVD HD really well.

The A52Codec used to be available as a separate download - it's now part of the Perian development effort. Many thanks to the Perian team.

Thursday, September 07, 2006

Root on a Mac: sudo -s

I like a melodramatic MOTD when logging in. Here's apple's take when doing a sudo -s.

We trust you have received the usual lecture from the local System
Administrator. It usually boils down to these three things:

#1) Respect the privacy of others.
#2) Think before you type.
#3) With great power comes great responsibility.

Nice :) Makes me feel like Frodo.

Sunday, September 03, 2006

Don't even think about 512mb of RAM

When I first got my MacBook it had 512mb of RAM in it. This lets you run about 2 applications at once (maximum) and if you want to load 5000 photos into iPhoto, you can forget it - it just crashes.

I've since upgraded to 2 gig and never hit the memory limit. It's easy to consume over 1 gig though so 2 gig is highly recommended, especially for an operating system that is meant for media like OS X is.

And you have to buy the memory in pairs so it's probably better to upgrade when you buy the machine unless you want 2x256mb chips sitting around.

Saturday, September 02, 2006

Restore broken on Intel Mac OS X 10.4.7

Un-farking-believable!

This is amazing news - you can't restore from the OS X boot disk if you own an Intel Mac.

Not because the feature isn't there, but because there's a bug. A bug! If there's any place you don't want bugs it's in the system restore.

Disk Utility should let you drag your destination device to the destination field but a screw-up in the mode of the list of devices renders them as a text list complete with copy/paste menus. So you can't drag and drop - it just does a multi-selection! (see image)

I thought I was going mad until the truth dawned on me - it's broken.

The work-arounds in the article are completely unsatisfactory. Apple should offer a replacement bootdisk for download that just contains Disk Utility at the very least.

I'm glad time machine has been created - that might make up for a stuff-up of this magnitude. I had to mount the disk and restore the Users and Applications manually under a different user to get around this (it was necessary after getting a replacement Mac when battery problems made it DOA).

[Note: You might be able to create your own boot disk and fix the Disk Utility app problem by visiting tuaw.com and reading this post].

[Update 2: You can create an OS X install disk by creating a DMG from the OS X install disk using Disk Utility, remove unnecessary files from the install disk image, then use Disk Utility to restore the smaller OS X Image to a DVD-sized blank sparseimage (just ignore the error 22 at the end). I updated the Disk Utility as part of the process and before booting on the new boot disk - it still failed as above. So this process isn't worth doing and there isn't a way to do a restore. Over to you Apple...]

OS X doesn't support writing to NTFS volumes (only read)

A warning: if you have external hard drives formatted under NTFS, you may need to reformat them as FAT32 or MAC OS Extended filesystem. OS X won't write to an NTFS drive.

This was a problem for me because my external HD has all my iTunes music. I used a great free utility called fat32format - it formats FAT32 drives > 32GB.
You can find the utility here.

I think you can format the external disk specifying an MS-DOS filesystem using Disk Utility, but I didn't try that.

Useful startup (boot-time) shortcut keys


There's a couple of important shortcut keys when you boot up your Mac:


1. Holding down Option shows the boot menu so you can specify booting from a CDROM or USB/Firewire disk (picture shows bootup menu when inserting the Mac OS X Install Disc and holding Option key down on boot-up).

2. Holding down SHIFT ejects any discs in the drive.

Get to know Disk Utility

At first, I dismissed this as a lightweight system tool, but it turns out this is quite a versatile utility.

You can copy DVDs and create disk images (DMG) files. You can also restore files from those images.

It will check the health of disks (like chkdsk) - I presume it uses something like fsck under unix.

You can also partition the drive and format drives as Mac OS Extended filesystem, MS-DOS (FAT32) or UNIX file system.

[It's not as versatile when you boot the OS X install disk on Intel, see next post]

Windows Remote desktop for the Mac

I didn't know!
It's available... just go here. It's a little klunky but works okay - you can only have one session open at a time though (AFAIK), which isn't the best but it works and you can transfer files too if you don't want to use network shares.

Maximise key and Quicksilver

There's no maximise key or action in OS X. This truly sucks - if only you could change the double-click on the title bar to maximise. Argh! That's one thing that Windows got right.

So as a work-around (and this takes some highly pleasurable fiddling), you can assign a key to maximise the current window. See this article from the macosxhints site.

Part of this work-around is to install Quicksilver (link: http://quicksilver.blacktree.com/).

Quicksilver is an application launcher with full application integration and scripting capabilities. This is what allows you to bind the AppleScript command to a keystroke combination.

Its UI is polished and slick, with even the most mundane tasks like loading add-ins getting a spinning-cube effect. Nice.

Highly recommended - this joins Automator and AppleScript as a set of useful tools you can use to get results from without reading any documentation.

The keys to know

There are a few keys that make life much easier on the Mac. Just knowing these make the move from Windows far easier.

F9 - THE BEST KEY
Separates all windows in a scaled, top-down view and allows easy selection on a busy desktop. Pressing F9 again restores the original window positions.


F10 - Same as F9 but for the current application.


F11 - Move all windows to the edge of the screen to reveal the desktop. You can interact with the desktop then press F11 again to restore the original window positions.


F12 - Reveal your widgets.


The main modifier keys used on a Mac are the Control, Alt/Option and Command/Apple keys.


Command-Tab: Same as Alt-Tab in Windows - switch between running applications. The difference is that on the Mac it doesn't swap between application (MDI) windows - like multiple Pages or Word documents. To do this, see below:


Command - ~ (Command-Tilde): This swaps between the active windows in a single application rather than between applications like Command-Tab does. Makes it easy to cycle through Finder windows or multiple word processing documents.

Command-W: Close open window (not application - like CTRL-F4 in Windows).

Command-Space: Open spotlight search.

(See Expose to change these assignments in System Preferences)

The computer is your friend, the printer is your enemy

Printing to a Windows network using a Mac can be frustrating. While there's obviously been work on making this an easy process, there's still some bugs.

This page from Apple explains how to use an advanced dialog to customise the underlying Samba connection string.

In summary, for the A-type personalities out there:
  1. Hold down the Option key while clicking the "More Printers" button then choose "Advanced" from the first drop-down menu (this isn't that obvious and looks like a hack).
  2. Create a user with little or no permisisons on your Windows PC except printing rights. Your Windows PC has the printer attached.
  3. Edit the Samba connection string. I used: smb://user:password@server/sharename where sharename is the printer share. The security of this will worry some. Apple mumble moment.
  4. Choose your printer from the list of drivers, if it exists.
Simple!

Don't ask me how to manually specify a printer not in the list - the process is baffling even for someone technical.

The problem with the automated process is that it tries to use smb://workgroup/server/sharename and then doesn't authenticate properly giving a samba authentication error.

If the above doesn't help, read the article. I got it working in the end and although I don't have advanced print options available, it prints fine.

Startup woes - vertical coloured lines and PRAM

During my battery problems (see previous post), I had trouble starting up my Mac, even when the battery was in and had charge. I'd get one of two problems: either a grey screen when powering on and then... nothing or vertical coloured lines as below:

An extended Google search found the solution on the Apple site - the PRAM needed resetting.

If that doesn't work, try resetting your computer's PRAM (parameter random access memory), then repeating the X key steps above afterwards.

  1. Restart your computer and immediately press and hold the Command, Option, P, and R keys simultaneously before the gray screen appears.
  2. Continue holding these four keys until you hear the startup sound for the second time.
  3. Release the keys to allow your computer to start up normally.

Unfortunately, the original machine I received needed resetting so often that I'd always start up while holding the above keys.

Luckily, the replacement machine doesn't have this problem.

Wherefore art my battery?

As you can see, it's a bit hard to go to sleep when you have a new computer :)

This was the first indication the battery or power management unit (PMU) wasn't well - the "Calculating ... Remaining" persisted.

The battery charge indicator on the power supply plug was displaying orange rather than green even though it had been connected all day. It also displayed a small cross in the battery toolbar icon indicating the battery wasn't installed (as below).


The battery was holding charge but the OS wasn't able to read the levels so it resulted in some erratic behaviour like the PC shutting off cold rather than going to sleep like it should when battery power gets low.

I took the machine back to the store and th
ey arranged for a new battery. After three days of running on power I picked up the new battery and saw the same thing happen... annoying.

Apple have a 10 business-day DOA (dead on arrival) policy. Originally the Apple store was saying I'd have to leave it
at the store for 2-3 weeks until Apple picked it up but after talking to a couple of other stores, I realised they have to replace it if it's faulty within this period. The laws may differ in your country, so it's worth checking.

I highly recommend doing this if your Mac is playing up.

I returning my Mac on day 10 of the 10 day DOA period and got a brand-spanking new machine.

This one turned out to be good:


First Impressions


The first thing you notice is the presentation and attention to detail. The MacBook is packed snugly in a soft filmy cover and the remote control, power supply and instruction manuals are all neatly arranged and in easy reach. Unpacking all this is tech-porn for a geek with any new computer, but Apple makes it high-class.

The machine itself is very thin and feels relatively light and compact. I got the 13.3" dual-2GHz model so the screen is smaller than I'm used to and limited to 1280x800 resolution but it's bright, crisp and very readable.

The setup proces with the revolving box effect is made exceptional with the login photo taken on the spot with the built-in iSite camera.

I've got a home network with an Apple Airport Express 802.11g network and it was smart enough to detect all settings and alert me that the MAC address wasn't registered with the hub. It let me progress and I configured the wireless later after doing a quick "ifconfig" from the Terminal app. Using a bash shell under all this eye-candy is pretty thrilling and makes you feel like there's endless possibilities under the hood to play with.

The startup was painless and fast. Before long, I was logged in and faced with the challenge of re-learning all the UI shortcuts and methodologies I'd gotten used to on Windows. Fortunately, that only really takes a day or two. It helps if you've got friends to give you tips as well :) I'll discuss that in a future post.

Not all things went right though - it was obvious from the start that the battery indicator wasn't registering the battery even though there was one installed. That was the start of many trips back to my Apple store to work it out. It figures. 2006 should be called "Year of the battery", apart from being "Sony's year of hell".

Welcome

I've finally switched over to using a MacBook after working on Windows machines for years. Macs are now competitively priced so I took the plunge. So far it's been a good experience, but not without its trials.

Welcome to Mac Tech, YASB (Yet Another Switching Blog).